AI Image to Video Generator: Transform Photos into Stunning Videos
ai image to video generator
Welcome Offer! Get 56% OFF!


Learn how to generate AI images from text with our creator's guide. Uncover expert tips, prompt secrets, and pro tools to turn your ideas into stunning visuals.
Welcome to the wild, wonderful, and slightly weird world of AI image generation. If you've ever found yourself endlessly scrolling through stock photo sites looking for that perfect image, only to settle for "good enough," you're in the right place. We're about to ditch the generic and learn how to generate AI images from text, turning your wildest ideas into stunning visuals with just a few words.
This is your chance to become the artist you never knew you were.
This isn't just a cool party trick; it's a genuine game-changer for content creation. The power to instantly visualize a concept—whether it's for a quirky social media post, a sharp blog header, or a full-blown ad campaign—is a massive competitive edge.
Let's be clear: this is not a niche trend. The AI image generator market is on a rocket ship, projected to blast from around USD 419.2 million in 2024 to USD 1,880.3 million by 2033. That incredible growth screams one thing: people and businesses are desperate for faster, more affordable ways to create visuals that actually stand out.
This technology marks a fundamental shift in how we think about visual strategy. Instead of hunting for an image that almost works, you can now craft one that’s a perfect 10 every single time.
Think of it as having an infinitely patient and ridiculously talented artist on call 24/7, ready to bring any idea to life in seconds. The only real limit is how well you can describe what’s in your head.
The shockwaves from this tech go far beyond just making cool images. As AI continues to reshape the creative world, it’s also changing how we find information online. We’re seeing the rise of entirely new fields like Generative Engine Optimization, which is all about creating content that AI-driven search tools will love.
For anyone using SendFame, this means the images you create can be more than just eye candy. They can become a core part of a smarter, future-proof content strategy.
Getting your hands dirty is surprisingly straightforward. I've been doing this for a while, and it really boils down to a simple, repeatable flow. This quick table breaks it down.
| Stage | Key Action | Why It Matters |
|---|---|---|
| Dream It Up | Nail down your core idea. What's the subject? What's the vibe? | A fuzzy idea leads to a fuzzy image. Clarity is your best friend. |
| Write It Down | Craft a descriptive text prompt. Use adjectives! | This is your direct line to the AI. The better the description, the better the result. |
| Generate & Tweak | Hit "generate" and see what comes back. Refine your prompt based on the output. | Your first try is rarely your last. Iteration is where the magic happens. |
This guide will walk you through each of these stages in detail. By the end, you'll go from being a curious beginner to a prompt-crafting pro, ready to create visuals that stop the scroll.
Let's be honest, the real magic behind getting a jaw-dropping AI image isn't buried in some secret setting. It all comes down to the prompt you feed the machine. A lazy, one-word prompt like "dog" is a surefire way to get a boring, generic picture. But a rich, descriptive prompt? That’s like handing a master artist the perfect creative brief.
Think of yourself less as someone typing into a box and more as an art director. You're painting a picture with your words. Instead of just saying "a forest," you need to bring it to life. How about: "an enchanted forest at twilight, with beams of moonlight slicing through ancient, mossy trees, and glowing mushrooms lighting up the ground." See the difference? One is a vague idea; the other is a whole vibe.
Getting specific is your secret weapon. The more juicy details you throw in, the closer the AI can get to recreating that image floating around in your head. A fantastic way to organize your thoughts is to break down the scene into its core parts.
I’ve found that a simple but powerful framework is Subject + Action + Style + Composition.
Subject: Who or what is the star of the show? Get specific. "A majestic lion with a fiery golden mane" has way more punch than just "a lion." Action: What’s the subject up to? "Staring intently at the camera" adds instant drama and a focal point. Style: This is where you set the mood. Are we talking "photorealistic portrait," an "impressionist oil painting," or maybe some "cyberpunk concept art"? The style defines the entire feel. Composition: How is everything framed? Think like a photographer. Use terms like "cinematic lighting," "wide-angle shot," or "macro detail" to guide the AI's "lens."
Let's take a simple idea like "a knight" and give it a serious upgrade.
Basic Prompt: a knight in armor
Detailed Prompt: A stoic female knight in ornate, polished silver armor, standing on a misty mountaintop at dawn, cinematic lighting, epic fantasy painting, highly detailed.
Now we're not just making an image; we're telling a story.
The best prompts I write often read like a short, descriptive paragraph. You're basically guiding the AI's digital paintbrush with every word. The goal is to leave as little to chance as possible—unless, of course, you're in the mood for a happy accident!
Once you’ve got a solid foundation, it’s time to sprinkle in the secret sauce: keywords and modifiers. These are the little terms that tell the AI how to render your scene. Think of them as the fine-tuning knobs for getting the quality and aesthetic just right.
Here are a few of my go-to modifiers that can make a world of difference:
For that crispy quality: Add phrases like highly detailed, intricate, sharp focus, or even 4K to tell the AI you mean business. To set the mood with light: Words are everything here. Cinematic lighting, soft ambient light, dramatic lighting, or golden hour can completely transform a scene. For a dash of artistic flair: Want a nostalgic, grainy vibe? Try shot on 35mm film. For that slick, video-game look, add Unreal Engine.
Let's imagine you're mocking up a product shot for a new coffee brand. You could go from something basic to something that feels like a real, professional photograph.
Before: a cup of coffee
After: A steaming cup of black coffee on a rustic wooden table, soft morning light from a window, photorealistic, macro shot, steam gently rising, highly detailed.
This deliberate approach is what separates random button-mashing from predictable, powerful creation. When you master the art of the prompt, you gain an incredible amount of control, turning your imagination into stunning visuals, every single time.
Alright, enough with the theory—let's roll up our sleeves and actually make something cool. It’s time to dive into SendFame and see just how easy it is to bring an idea to life. We’re going to walk through the process together, not just by pointing out buttons, but by getting into the why behind each click.
Let's pretend we're creating a mascot for a new, hip coffee brand called "Cosmic Brew." The vibe we're after is a friendly, futuristic robot. It needs to look high-tech but still feel like a buddy you'd grab a coffee with.
When you first land on the generator, you'll see it’s refreshingly simple. The star of the show is the prompt box. Think of this as your direct line to the AI's imagination. This is where you'll paint a picture with words.
Just below that, you’ll find the essential settings. These are your creative levers. Getting a feel for them is the secret to avoiding those weird, frustrating results and getting exactly what you want. We'll use a few key ones for our robot mascot.
Here's a quick look at how your prompt turns into a final image.
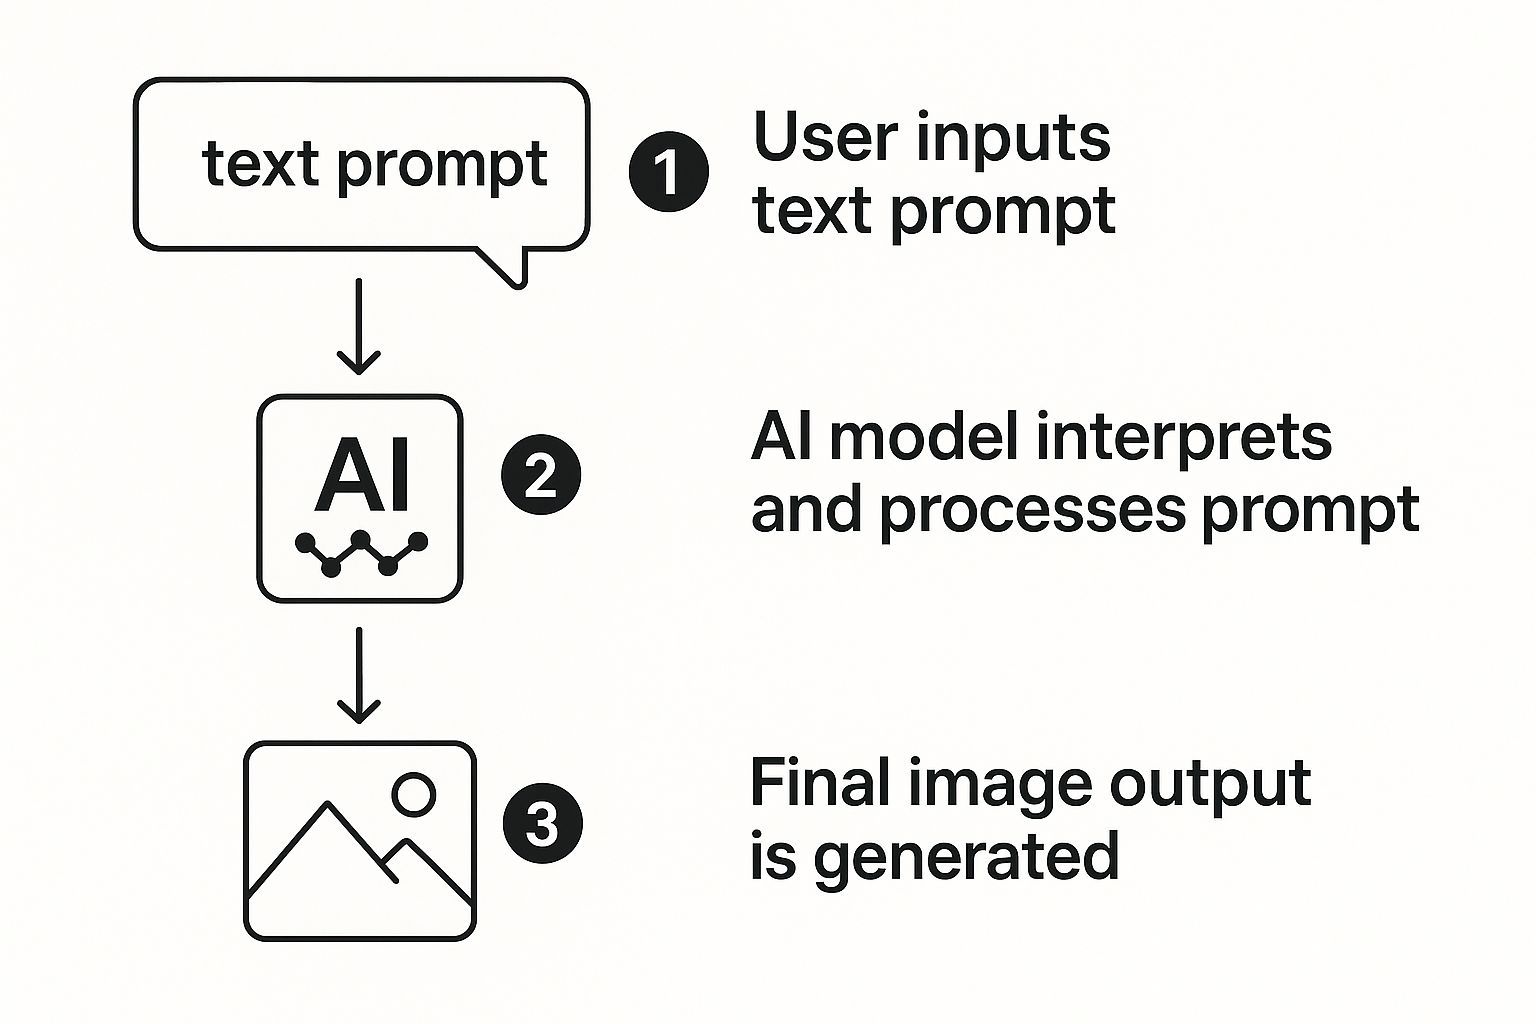
It’s a straightforward flow: your detailed description acts as a blueprint, and the AI builds the image pixel by pixel based on your instructions.
For our "Cosmic Brew" mascot, I’ll start with a prompt that's descriptive but not overly complex: A cute, friendly robot mascot holding a steaming coffee mug, minimalist design, futuristic, smooth white and blue details, studio lighting. I'll pop this right into the main text area.
Hold on, don't hit that "Generate" button just yet! We need to think about the canvas. The Aspect Ratio is super important. Since this mascot might end up on Instagram, a 1:1 (Square) ratio is a solid choice. If we were designing a website banner, 16:9 (Widescreen) would be the way to go.
Next, the Negative Prompt. This little box is your bouncer, telling the AI what's not allowed in the picture. AI can get a little weird with hands and limbs, so a good starting point is to type in things like ugly, deformed, extra fingers, blurry, bad anatomy. This is a pro-level move that cleans up a ton of potential junk before the AI even starts.
With our prompts locked and loaded, we're ready for the magic. This screenshot shows our exact setup in the SendFame AI image generator, all set for our first go.
Everything we need is right there, which makes the whole process feel natural and easy. Now, the fun part. Let's click "Generate" and see what the AI serves up for Cosmic Brew.
Let's be real for a second. Your first AI-generated image is almost never "the one." It's more like a first draft—a rough sketch. Think of it as the starting block, not the finish line. The true magic happens when you stop just commanding the AI and start collaborating with it.
This is where the real fun begins. You'll learn to tweak, troubleshoot, and gently nudge the AI from a pretty good image to a jaw-dropping one. It's less like programming and more like a creative dance.
Sometimes, the most powerful way to guide the AI is by telling it what to avoid. This is where negative prompts come in, and trust me, they're your secret weapon. These are simply instructions telling the generator what to leave out, helping you dodge all the classic AI quirks right from the start.
Ever get that perfect scene, only to notice the person has seven fingers or there’s some weird, alien-like text floating in the background? A negative prompt is your go-to cleanup crew for that kind of nonsense.
For instance, whenever I'm creating character portraits, I have a standard list of negative prompts I throw in to sidestep the usual weirdness:
deformed hands, extra limbs, bad anatomy blurry, grainy, low quality watermarks, text, signatures
Think of these as guardrails for your creativity. You're blocking the common dead-ends, which frees up the AI to pour all its energy into the awesome stuff you actually asked for.
By telling the AI what to avoid, you dramatically increase the odds of getting a polished and usable image on the first few tries. It's a simple step that saves a ton of time.
So, what do you do when an image is 95% perfect but has one little detail that’s driving you crazy? You don’t have to ditch it and start over. This is where you get to play digital surgeon with advanced editing tools.
Tools like inpainting are a lifesaver. You can highlight a specific part of your image—maybe a funky-looking hand or a car that just doesn't fit—and have the AI regenerate only that spot based on a new, more specific prompt. It’s like a magic eraser that can think.
On the flip side, outpainting lets you see what’s beyond the borders of your original creation. Got an amazing character portrait but wish you could zoom out to see the epic landscape they're in? Outpainting can build out the rest of the scene, extending the canvas in any direction while perfectly matching the original style.
Ready to take the driver's seat? You can dive into all these powerful features and take total control of your final image with the SendFame AI image editor.
Often, the journey from "good" to "great" isn't a giant leap. It’s a series of small, intentional steps. The difference between a decent image and a mind-blowing one can boil down to just one or two carefully chosen words.
Instead of tearing up your prompt and starting from scratch, try making tiny, surgical changes and hitting that generate button again. It’s this back-and-forth that really hones your creative instincts.
Try making these kinds of small adjustments:
Adjective Swaps: Is it just a "happy dog," or is it a "joyful dog"? Or better yet, an "ecstatic dog"? Each word paints a different picture. Lighting Changes: Instead of "daylight," try "golden hour lighting" or "moody, cinematic lighting." The vibe can change completely. Style Modifiers: Add a new layer by changing "hyperrealistic photo" to "impressionist oil painting."
By tweaking one thing at a time, you see the direct impact of each word. This methodical process is how you learn the AI's language, turning you into a much more effective and intuitive creator with every image you make.
Alright, you’ve nailed the basics and are ready to create images that genuinely make people stop and stare. This is where the real fun begins—where you learn to coax the AI into producing visuals that are polished, professional, and have your unique stamp on them. Let's dive into the techniques that separate the dabblers from the digital Da Vincis.
One of the most common headaches is getting a character to look the same across multiple images. It’s a classic AI quirk. The secret I’ve found? Treat your character description like a D&D character sheet. Be obsessively consistent and detailed in every single prompt.
Once you get the hang of writing descriptive prompts, it's time to add some more sophisticated controls. A game-changer for me was prompt weighting. This is your way of telling the AI, "Hey, this part is really important!" By emphasizing specific words, you give them more say in the final image.
Let's say you're after a “beautiful fantasy castle on a misty mountain,” but the AI is giving you a whole lot of mountain and not much castle. You can tweak your prompt to give the castle more clout, steering the composition exactly where you want it. For a masterclass on removing things you don't want, check out this guide on mastering negative prompts in Stable Diffusion.
A massive part of leveling up your images is to stop thinking like a writer and start thinking like a cinematographer. Don't just describe the scene—direct it. Call out camera angles and specific lenses to completely change how someone experiences your image.
Ready to play director? Here are a few camera commands to try:
For epic scale: Use phrases like drone shot, aerial view, or my personal favorite, low-angle shot, to make your subject look massive. For intimate detail: Try macro photography for tiny details or close-up portrait for intense emotion. For a unique vibe: A fisheye lens will give you a cool, distorted look, while a telephoto lens creates a beautifully compressed, distant feel.
Why box yourself into one style when you can create a fusion? The most unforgettable AI art often springs from mashing up totally unexpected concepts. Seriously, get weird with it.
For instance, what happens when you combine:
Cyberpunk street market + impressionist oil painting Ancient Roman sculpture + Art Deco patterns Gothic architecture + vibrant pop art colors
This kind of experimentation is what pushes the AI into new creative territory and helps you discover a visual style that's all yours. It's a fantastic way to break out of a creative rut. If you're curious about what other tools can do, have a look at our roundup of the best AI image generators out there.
Generating images from text is exploding, and it's not just for fun anymore—it’s a massive industry. The global AI image generator market is projected to leap from USD 8.7 billion in 2024 to an incredible USD 60.8 billion by 2030. This growth is all about the increasing need for tools that can quickly turn a few words into stunning, consistent visuals.
Jumping into AI image generation is a blast, but let's be real—it can also feel a little weird at first. You're bound to have a few questions pop up as you start turning text into art. That's totally normal! We've been there.
To help you skip the confusion and get straight to creating awesome visuals, we've rounded up the most common questions we hear and answered them with some straight-up, practical advice.
Heck yes, you can! This is a big one. You’ve just generated a fantastic image, but you’re wondering if it’s sharp enough for a big print or a high-res ad. While most AI generators give you a solid starting resolution, sometimes you just need more.
Don’t worry, you’re not stuck with a low-res image. This is where an AI upscaler becomes your best friend. These tools use artificial intelligence to smartly increase the resolution and sharpen the details of your image without making it look blurry or pixelated.
Think of it as giving your image a high-definition makeover. It’s perfect for taking a cool graphic you made for social media and getting it ready for a printed poster. To see it in action, you can learn how to upscale and enhance your AI-generated pictures and get that professional polish.
It's a game-changer. Being able to generate an image from a simple idea and then upscale it gives you a complete creative workflow. You can literally go from a random thought to a professional, high-resolution visual in a matter of minutes.
Ah, consistency—the holy grail of AI image creation. Getting the same character or style across multiple images can feel like wrangling cats at first. I get it.
The secret? It all comes down to prompt discipline.
Once you nail a prompt that creates a character you love, save that exact prompt. Treat it like a secret recipe. For the next image, reuse that core prompt and only tweak the specific parts you want to change, like the action or the background. This methodical approach is how you create a whole series of images that look like they belong together. It takes a little practice, but you'll get the hang of it.
This is a crucial topic. When you create an image with a tool like SendFame, the ownership rights are generally very permissive. This means you can often use your creations for commercial projects, your social media empire, or just for fun. But here's a pro-tip: always, always give the terms of service a quick read on any platform you use. It's just smart practice.
On the safety front, you’ll be glad to know that reputable platforms have robust safeguards in place. They work hard to block the creation of harmful or inappropriate content. For example, Google's Imagen 3 model uses a cool digital watermarking tool called SynthID. It helps identify AI-generated images, which is a big step toward preventing misuse and keeping the creative space safe for everyone.
Ready to bring your wildest ideas to life? With SendFame, you can generate stunning AI images, videos, music, and more in just seconds. Start creating for free today.
Create Epic
SendFame
Create Epic with SendFame!
Questions: info@sendfame.com