The Creator's Blueprint: Building a Sustainable TikTok Presence That Actually Converts
marketing strategies
Welcome offer: 56% off


Learn what a music visualizer is, the common styles, how sound becomes motion, and how to build one yourself, plus rights and accessibility tips.
You've uploaded a new single with its cover image, but the post feels unfinished. The song builds, the chorus arrives, and the picture stays exactly the same. You want movement that belongs to the music, not an animation that happens to play beside it.
A music visualizer can provide that connection. The useful question isn't which effect looks most impressive. It's which part of the sound should move which part of the picture, and whether the result works where you'll publish it.
What a Music Visualizer Is and Why It WorksCommon Music Visualizer Styles and Where Each Fits Choose for the viewing situationHow Sound Becomes Motion on Screen From samples to usable controls Give each feature a clear jobWhere Music Visualizers Get Used Today Design for the destinationHow revid.ai Can Help Match the tool to the jobThree Ways to Build a Music Visualizer Compared Make the choice around your constraintsHow to Build a Music Visualizer Step by Step Prepare and connect Finish and test A code route follows the same production logicRights and Accessibility Checks Before You Publish Document what you can use Make the experience usablePick One Style and Ship a Test Clip
A music visualizer is software that reads a music track and generates moving graphics that respond to it, either during playback or in an exported video. The audio is the input, the picture is the output, and the software translates between them.
Think of it as a dance partner following the rhythm rather than a film telling a story. A kick drum might make a circle expand. A sustained synth might gradually change the background color. Those connections make musical changes visible without requiring actors, locations, or a narrative.
The terminology can be confusing because creators and software companies use overlapping labels:
Music visualizer: Graphics driven by information from a song, such as frequency energy, note attacks, or musical timing. Audio visualizer: The broader category, covering graphics made from any sound, including speech, interviews, and sound effects. Music video: A planned visual production accompanying music. It may contain visualization, but its scenes don't have to respond to audio data.
An animated cover isn't automatically audio-reactive. If its clouds drift identically regardless of what's playing, it's a motion background rather than a visualization of the track.
Creators use visualizers to reveal rhythm, establish mood, reinforce release artwork, and give an audio upload a visual presence. None of those goals requires constant spectacle. A restrained pulse around a recognizable cover can communicate more clearly than a screen full of unrelated effects.
A visualizer doesn't merely decorate music. It shows the music's structure.
Music visualizer styles compared
| Style | What It Shows | Best For | Main Drawback |
|---|---|---|---|
| Waveform | Signal amplitude over time as a line | Podcasts, quick uploads, lyric clips | Says little about rhythm or tone |
| Spectrum bars | Frequency bands as vertical bars | Music releases, streams, classic player look | Looks generic without custom color |
| Particle field | Many points pushed by bass and treble | Ambient, electronic, and cinematic tracks | Graphics-intensive; busy with dense mixes |
| Geometric or 3D object | Shapes that pulse, rotate, or scale with bands | Logo motion, EDM, album art animation | Can clutter the frame without scaling limits |
| Shader or preset abstract | Fluid, feedback-based patterns | Psychedelic loops, long mixes, VJ sets | Steeper learning curve for editing presets |
| Lyric visualizer | Words timed to vocals with soft background motion | Lyric videos, text-led uploads | Timing needs manual work or alignment |
| AI motion video | Generated scenes or loops tied to a mood prompt | Social clips, concept teasers | May have a weak connection to audio data; needs rights checks |
Spectrum bars are a common starting point because they reveal how energy changes across frequency bands. They suit a release upload or stream where viewers expect a familiar player-like display. Waveforms are simpler: their height represents amplitude over time, although the apparent shape changes with the display's zoom and processing.
Neither display understands musical meaning by itself. A waveform doesn't identify a chorus, and a spectrum bar doesn't know whether its movement came from a vocal or a guitar occupying the same frequency range.
For a vocal-led song, give the words room. For a track without lyrics, abstract motion can carry more of the presentation. If the artwork already has a strong focal point, use these album cover art ideas to think about composition before placing moving elements around it.
According to Zeltor Labs' music visualization history, Winamp, released in 1997, helped distribute visualizers through plug-ins, while Ryan Geiss's MilkDrop, developed in 2001, used pixel shaders for fluid graphics and shareable presets. That preset tradition remains useful when you want an evolving look without animating every movement manually.
Choose the style that fits the track's energy and the viewer's context. A dense particle scene might suit a stage backdrop but make lyrics difficult to read on a phone. Generated scenery can establish atmosphere, but don't assume it follows the beat unless the tool actually analyzes and maps the audio.
Design rule: Style follows purpose. Complexity is a cost to the viewer, not an automatic bonus.
A graphic equalizer separates sound into low, middle, and high frequency regions. A music visualizer can perform a similar separation repeatedly during playback, then use those changing values to control graphics.
The important distinction is between analyzing sound and drawing an image. They're connected processes, but they don't have to update on the same schedule.
This diagram shows the path from incoming audio to rendered motion.
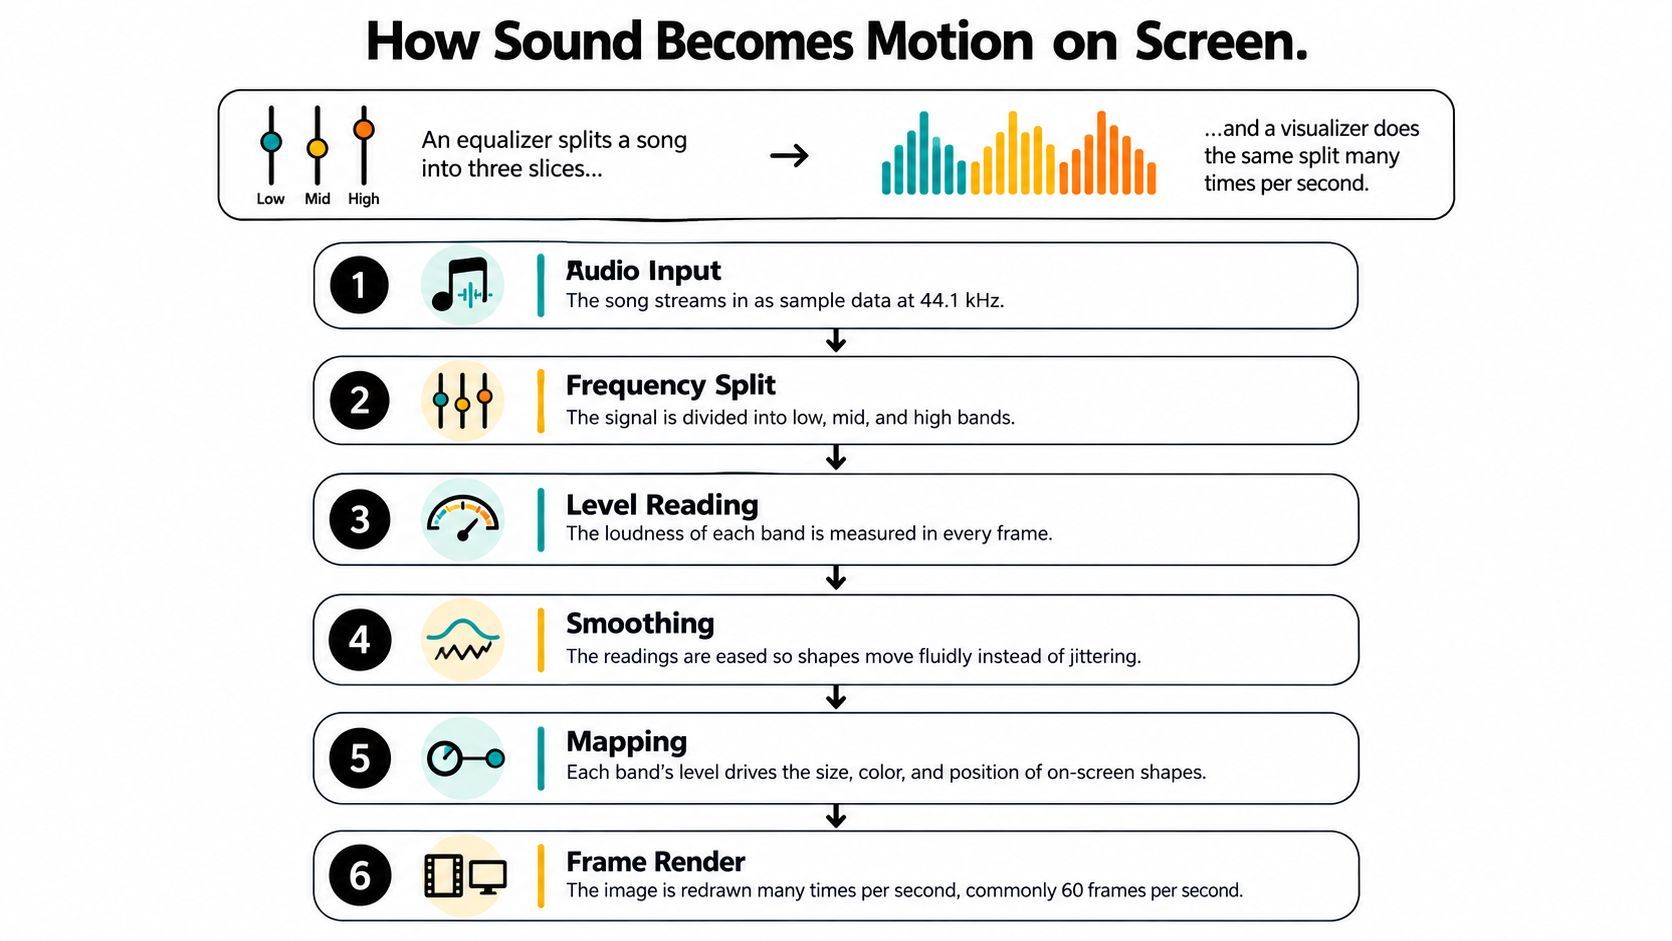
The software first reads the audio samples. A short-time Fourier transform, or STFT, examines overlapping windows of those samples to estimate which frequencies contain energy as the track progresses.
A visualization system described in Scientific Reports uses a 2,048-point analysis window and a 512-point hop, illustrating that the software advances through the audio in overlapping portions rather than isolated chunks. Those are implementation choices, not settings every creator must copy.
Longer analysis windows distinguish nearby frequencies more clearly but blur the timing of sudden events. Shorter windows locate attacks more sharply but produce less stable frequency detail. Think of photographing a moving drummer: an exposure that gathers more information can also blur the stick.
The software then groups useful frequency regions, smooths their readings, and passes the resulting values to the graphics engine. Raw amplitude alone gives everything the same control signal. Separate bands let a bass hit enlarge the central shape while bright percussion activates small details elsewhere.
Audio features and the visual parameters they control
| Audio Feature | What It Measures | Visual Parameter | Practical Note |
|---|---|---|---|
| Bass | Low-frequency energy, often including kick and sub-bass | Scale of the main shape | Let the shape settle gradually without hiding the next kick |
| Midrange | Energy often containing vocals, guitars, and snares | Color shift or orbit speed | Use gradual changes so vocal detail doesn't cause flicker |
| Treble | High-frequency energy, often including hi-hats and cymbals | Particle activity or sparkle | Raise the trigger threshold if background detail causes jitter |
| Overall loudness | Overall signal level over time | Global brightness or scale | Useful for broad intensity, but doesn't identify musical events |
| Onset or beat detection | Likely note attacks or beat locations | Cut, accent, or camera movement | Check for false triggers during busy passages |
Frequency bands aren't instrument separators. A snare can contribute energy across several bands, and a bass sound can contain bright harmonics. Listen while adjusting the mapping rather than trusting the band labels.
For a moving demonstration, watch how distinct sounds correspond to distinct visual changes.
Use a fast attack so hits register promptly and a slower release so the response settles instead of flickering. Too much smoothing makes the image sluggish; too little makes it nervous.
The music visualizer software market was valued at USD 340.5 million in 2025, with content creation and streaming accounting for 48.8% of the market, according to PMR Research. That makes publishing workflows a substantial use case, but it doesn't establish which visual style performs best.
Your destination should determine the deliverable. Consider these practical differences:
Streaming and YouTube uploads: A widescreen composition with cover art and a spectrum or particle layer can accompany the full track. Keep peripheral motion restrained enough for extended viewing. Social clips: Use a portrait composition built around a self-contained musical moment. Put the recognizable hook and essential text where interface controls won't obscure them. Live performance and VJ sets: Preset-driven scenes can run across an extended set. Operators need dependable playback, controllable transitions, and a way to recover quickly if an input fails. Release marketing: A lyric excerpt or animated logo can support a teaser or pre-save campaign. Keep the call to action separate from the busiest visual area. Podcasts and spoken shows: A waveform beside speaker information can indicate activity, while readable captions communicate what's being said. The graphic should support the speaker rather than compete with the text.
A full-song upload and a promotional excerpt aren't interchangeable exports. The former needs visual endurance; the latter needs a clear entry point and an ending that doesn't feel accidental.
Planning social media for musicians also means deciding what each post should accomplish. Choose the use case before building the scene, because it determines the duration, composition, text placement, and acceptable level of motion.
| Route | What You Start With | Main Advantage | What to Check |
|---|---|---|---|
| AI-assisted social video workflow | An idea, script, or existing content | Helps assemble a publishable, text-led video | Script accuracy, scene relevance, and pacing |
| Generative music video workflow | Music and a visual direction | Creates imagery beyond bars and waveforms | Whether changes genuinely follow the music |
| Dedicated reactive visualizer | An audio file and visual mappings | Direct control over sound-driven movement | Export options and mapping controls |
Revid.ai is worth considering when your problem is broader than making a shape pulse. Its workflow centers on turning ideas or existing content into social videos, with script generation, content discovery, and an editor for customization.
That can suit an artist who wants a narrated release announcement, a lyric-led promotional piece, or a visual concept assembled without starting from an empty editing timeline. Its content-repurposing approach also makes more sense for turning written material into video than for building a custom frequency-analysis system.
For generated imagery accompanying a track, the AI music video generator from revid.ai is a relevant option to evaluate. Treat the result as an editable creative draft, not proof of precise audio synchronization or guaranteed audience response.
The interface screenshot provides a reference for the tool's presentation.
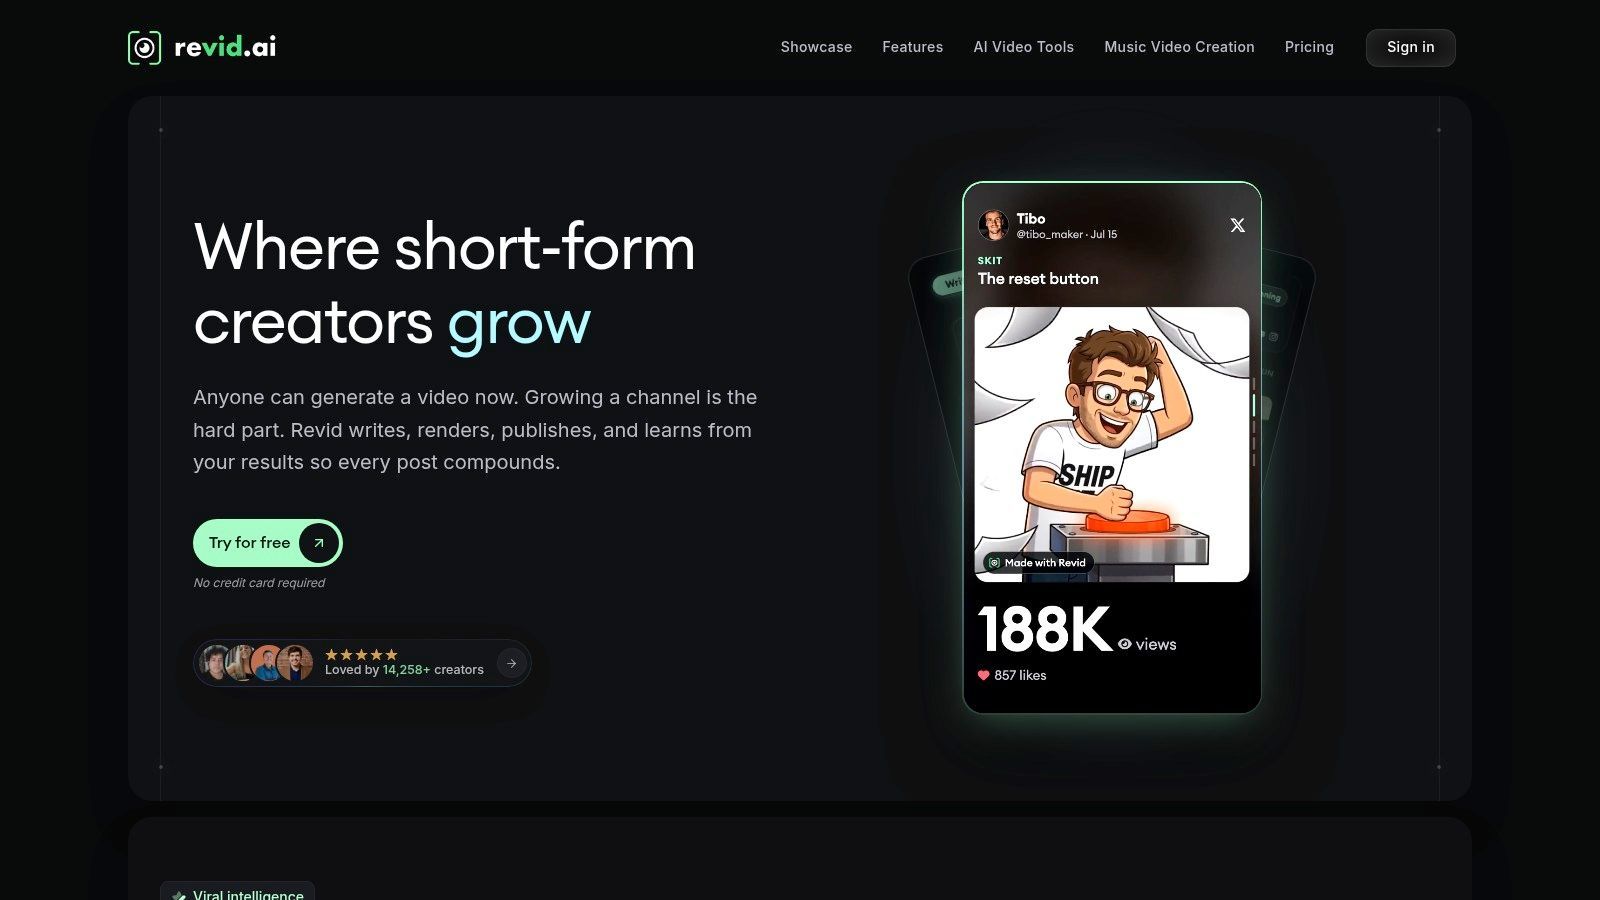
Before committing, test whether you can preserve your intended music, correct text, revise individual scenes, and export for your destination. Also inspect how much control you have over transitions: attractive scenes can still feel disconnected from a song.
Choose this kind of workflow when generating and assembling social content is your main obstacle. Choose a dedicated visualizer when you need explicit control over which audio feature drives each visual property.
Build routes for a music visualizer
| Route | Skill Needed | Typical Time to First Clip | Creative Control and Best Fit |
|---|---|---|---|
| Video editor with audio-reactive effects | Basic editing | After effect setup and an export test | Low to medium; one-off uploads |
| Visualizer app or preset tool | Beginner | After importing audio and tuning a preset | Medium; repeatable style across releases |
| Custom code with Web Audio API and WebGL or Canvas | Programming | After implementing analysis, drawing, and capture | Full control; product or brand experiences |
| AI music video generator in the browser | Prompting and editorial judgment | After generation, review, and revisions | Prompt-level control; teasers and social clips |
There are several tool routes, but the underlying choices are straightforward: edit an effect, configure a preset, or build the behavior yourself. Generative video offers a related alternative when you want scenes rather than a literal display of audio features.
Use an editor for a self-contained release asset. If you already work in After Effects or another editor with suitable audio-driven controls, keep the project there so titles, artwork, and finishing remain together. A common slip is assuming every editor includes a spectrum effect; check capabilities before comparing video editing software.Use presets for a repeatable release identity. Save your colors, artwork position, response limits, and export settings as a reusable project. Don't leave a preset unchanged if its default motion overwhelms the artist name or makes unrelated releases look identical.Write code when the behavior is part of the product. Web Audio API analysis can feed Canvas drawings or WebGL graphics, making this route suitable for interactive websites and branded experiences. The common mistake is building an attractive live demo before solving audio permissions, device performance, and recording.Generate scenes when atmosphere matters more than literal mapping. A browser-based AI workflow can help explore locations, textures, and visual concepts that would be difficult to film. Don't mistake prompt control for deterministic control over beat timing or recurring objects.
Choose around your next deadline and existing skills. The most powerful tool isn't the best choice if learning it prevents you from finishing.
A new visual layer isn't a publishing permission slip. Before investing in the render, establish that the track and artwork are usable for the release you intend to make.
For a preset or app workflow, build a small working composition before adding decorative layers. Use this process overview as a production reference, then tune the details to your actual destination rather than treating any illustrated export setting as universal.
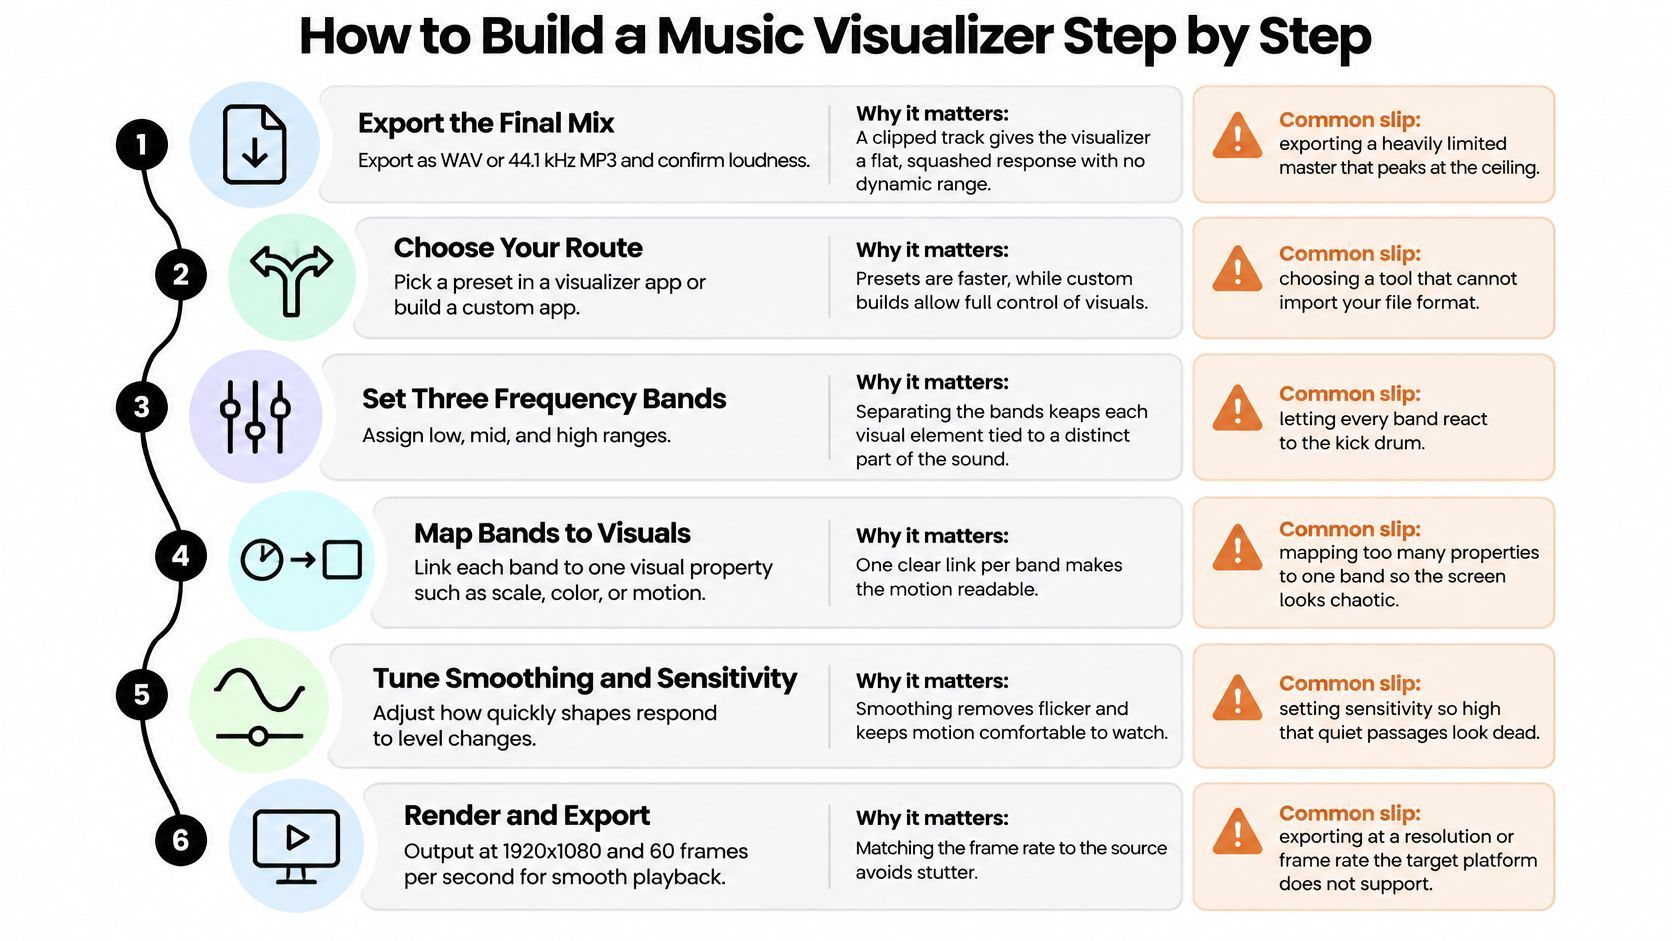
Prepare the final audio. Import a clean WAV when practical, and listen for clipping, accidental silence, or an outdated mix. Heavy limiting can reduce level variation, although frequency-based motion may still work; the common slip is trying to repair the master by increasing visual sensitivity. Choose a restrained starting design. Select a preset with a clear focal point and remove effects you don't need. Sketch which sound should control which element before touching every slider; otherwise, you can spend the whole session polishing unrelated motion. Set the canvas for the destination. Choose landscape, portrait, or square composition deliberately, then position artwork and text inside a comfortable viewing area. Don't assume cropping a landscape export will preserve the important parts on a portrait screen. Connect and tune the controls. Start with the main shape, isolate its driving band, and adjust its minimum and maximum size. Then introduce secondary motion, checking quiet and dense passages so the design doesn't disappear in the verse or overwhelm the chorus.
Add event accents selectively. Use detected attacks for a noticeable change only where that change serves the arrangement. A common slip is leaving detection sensitivity high enough that percussion fills trigger a succession of distracting movements. Place text above the effects. Add the artist name, track title, and any lyrics with deliberate line breaks. Check the most crowded lyric passage, not just the opening title, and avoid animated backgrounds that erase letter edges. Preview the whole musical arc. Check the intro, transitions, loudest passage, and ending at normal playback speed. Scrubbing through a timeline won't reveal whether repeated movement becomes tiring or whether the animation stops abruptly after the audio ends. Export and inspect the actual file. H.264 in an MP4 container is a practical starting point when your destination accepts it. Reopen the export, verify synchronization and text sharpness, and compare its properties with the platform's current upload requirements rather than relying on the preview window.
In a custom implementation, an update function reads the analyzed band values, applies your response curve and smoothing, and passes the results to a WebGL uniform or Canvas drawing operation. Keep analysis, mapping, and rendering separate so you can change the artwork without rewriting the audio handling.
Test recorded output separately from live playback. A browser scene that looks smooth on your own display may behave differently while capturing, resizing, or running on a less capable device.
Start by making a rights map for the project. The musical composition, sound recording, visual assets, performer's likeness or voice, and final edit can involve different permissions. Owning an audio file isn't necessarily the same as controlling every right needed for a video release.
Identify the rights holders. Record who controls the song and recording, and check permissions for pairing them with moving images, including synchronization rights where applicable. Clear any samples and licensed artwork for the intended use.Keep an authorship record. The U.S. Copyright Office's explanation of AI and human authorship states that purely AI-generated material isn't copyrightable and that protection depends on sufficient human control over expressive elements. Save drafts, prompts, edit logs, and project files to document your actual contributions.Check the publishing context. Commercial promotion, platform music libraries, and independently licensed tracks can involve different terms. Review Instagram and music copyright when planning that destination, and don't assume a platform's in-app music permission covers an exported campaign elsewhere.
Human selection, arrangement, and editing can support an authorship claim, but they don't guarantee protection for every element. Copyright rules also differ by jurisdiction; get qualified advice when ownership or licensing remains uncertain.
A waveform communicates activity, not the words being sung or spoken. Synchronized captions, high-contrast lyric timing, and descriptive text provide information that abstract movement cannot.
Before publishing, check the following:
Text access: Correct automated lyrics and captions manually, including names, punctuation, and language. Motion comfort: Remove rapid flashing and offer a reduced-motion alternative. Intense beat-linked movement can distract viewers and create photosensitivity risks. Muted playback: Confirm that the title, context, and essential message remain understandable without audio. Delivery weight: Inspect file size and playback behavior on a phone using a constrained connection.
These checks are part of distribution, not paperwork: they determine who can safely and meaningfully experience the release.
Choose a style that serves your track and a build route you can finish with your present skills. Make a short chorus excerpt before committing to a full-length render, and change only the most important mapping until the result feels intentional.
Watch the export without sound, inspect a reduced-motion version, and confirm that your permissions and project records are saved. If the clip fails any of those checks, revise the draft rather than adding more effects.
Before scaling up: A finished test that reveals a problem is more useful than a polished full-length export built around that problem.
Publish a version with a clear purpose, then examine viewer feedback and any available device-level results. If you can't observe muted viewing directly, test it with people rather than inventing an explanation for retention changes.
For a concept teaser, SendFame's browser-based generation tools can help turn a prompt into an initial audiovisual draft. Apply the same editorial, rights, and accessibility checks before treating that draft as release-ready.
A music visualizer is a map from sound to motion, and the best one is the simplest map that serves the viewer.