How to Make AI Song Covers That Actually Go Viral
how to make ai song covers
Welcome Offer! Get 56% OFF!


Discover how to turn photos into videos using AI, mobile apps, and expert editing tricks. Create stunning visual stories from your still images today.
Ever scroll through your camera roll and think, "Man, there's a real story hiding in these pictures"? You've got all these amazing shots, but individually, they just sit there. The real magic happens when you weave them together, transforming a folder of static images into a video that actually moves people.
If you feel like your photo library is a goldmine of untapped potential, you're absolutely right. Turning photos into video isn't about making a glorified flipbook; it's about becoming a storyteller. This guide is your new playbook for taking the photos you already have and turning them into something truly captivating, leaving boring slideshows in the dust.
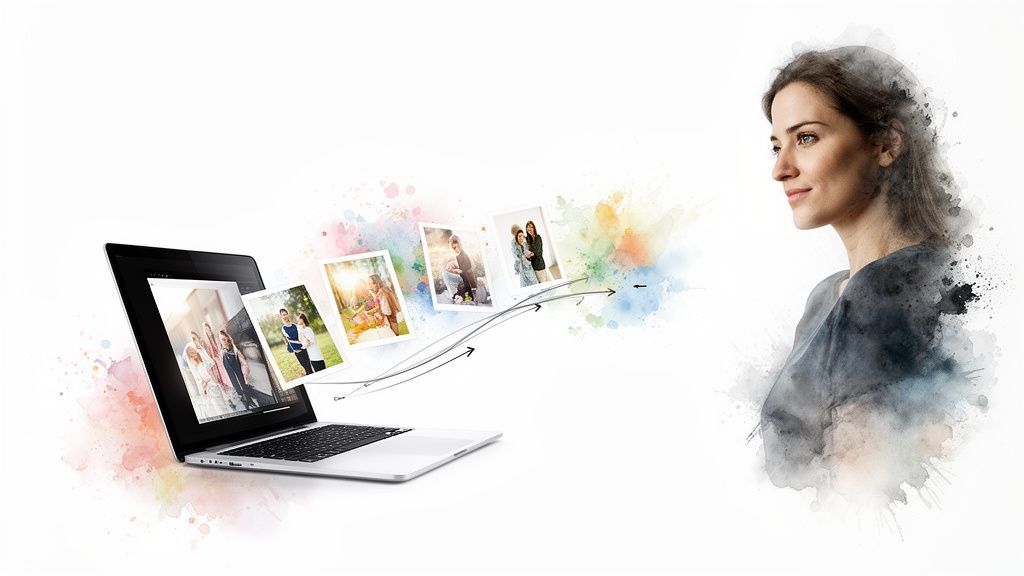
And it's not just a cool party trick; it's a massive trend. The AI video generator market alone was valued at $534.4 million and is expected to explode to $2,562.9 million by 2032. Why the surge? Because creators need fast, easy ways to animate their images into eye-catching clips without getting bogged down in complicated software.
Let's be real: we're all drowning in content. Video is the thing that breaks through the noise. It grabs and holds attention in a way a single, static image just can't compete with. Add a little motion, some great music, and a narrative thread, and you've suddenly created an experience.
Here’s what you gain:
Better Storytelling: You can finally connect the dots between your photos, creating a real arc with a beginning, middle, and end. Serious Engagement: It's a scientific fact—our brains are hardwired to pay attention to motion and sound. Video keeps people watching longer. An Emotional Gut Punch: The right song paired with the right timing can transform a simple collection of photos into something that hits you right in the feels.
The point isn't just to show off your photos. It's to make your audience feel something. A great photo-to-video creation can spark nostalgia, build excitement, or inspire action in a way a lone picture rarely can.
We're going to walk through three different ways to get this done. We'll look at instant AI generators for when you need something awesome, fast. We'll cover mobile apps for creating on the fly. And for the control freaks among us (you know who you are), we'll dive into powerful desktop software.
No matter your style or goal—whether you're creating a slick marketing promo or just want to breathe new life into old family photos—there's a workflow here for you. Speaking of old pictures, you can learn a lot more about that in our guide to AI-powered Old Photo Revival.
Jumping straight into an editor with a folder full of photos is a classic rookie mistake. It’s like trying to bake a cake by just throwing random ingredients into a bowl. You’ll make something, but it probably won’t be the masterpiece you had in mind. The secret to a killer video? A little bit of upfront thinking.
Before you even dream of cool transitions or the perfect background track, stop and ask yourself the most important question: What’s the point of this video? Seriously. Are you trying to make your friends jealous with a rapid-fire vacation recap? Create a tear-jerker birthday montage for Grandma? Or is this a polished, professional showcase for your new product? Your answer here sets the tone for everything that follows.
Once you know your "why," it’s time to map out the "how." The fancy term is storyboarding, but don't let that intimidate you. We’re not talking about some high-level Hollywood production sketch here. A storyboard can be as simple as a few notes scribbled on a napkin.
The idea is to get a bird's-eye view of your video's flow before you're lost in the weeds of editing. Think of it in three parts:
The Opener: What’s the first image that will make someone stop scrolling? This is your hook. The Middle: How do the photos in the middle connect? Maybe you're showing a project from start to finish or a day unfolding from dawn till dusk. This is where you build the narrative. The Grand Finale: What's the last, powerful image you want to leave them with? This is your payoff.
A storyboard isn't about perfect drawings; it's about making choices now instead of second-guessing yourself later. It’s the simple trick that transforms a jumble of pictures into a story people actually stick around to see.
With your roadmap in hand, it’s time to be a ruthless curator. This is not the time to include every single photo you took. Be picky. Every single image that makes the final cut needs to earn its spot.
Channel your inner film director and think critically about each shot.
| What to Look For | Why It’s a Game-Changer |
|---|---|
| High-Quality Images | Nothing screams "amateur hour" faster than a blurry, pixelated photo. Stick to the sharp stuff. |
| Consistent Vibe | Does the photo feel right for the story? A goofy selfie probably doesn't belong in a serious, emotional tribute. |
| Visual Variety | Don't just use a dozen similar shots. Mix it up! Go from a wide landscape to a tight close-up, or from a still portrait to an action shot. This keeps your audience engaged. |
You're trying to create a visual rhythm. A quick sequence of photos flashed on screen for 2 seconds each can create a feeling of high energy. On the other hand, a breathtaking landscape or an emotional portrait might need to linger for 5 or 6 seconds to really let the viewer soak it in. This is the grunt work that pays off big time, making the actual editing a breeze and your final video a thousand times better.
Alright, now for the fun part: picking your weapon of choice. The tool you use to turn your photos into a living, breathing video will completely define your creative journey and what you end up with. There's no single "best" tool—just the best one for what you're trying to do.
Let's break down the three main paths you can take.
This little decision tree can help you figure out which way to go based on your video's goal. Are you making something for your family or trying to sell a product? The answer changes everything.
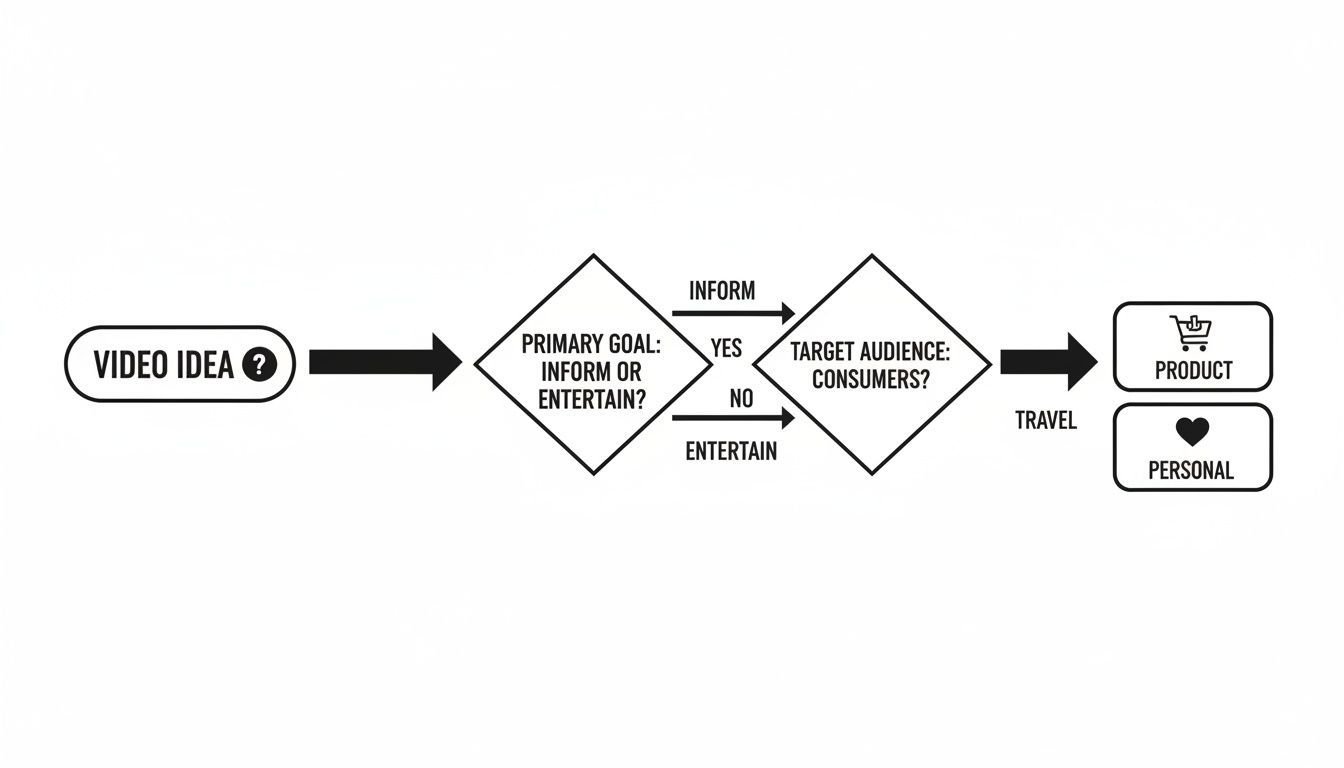
As you can see, a heartfelt personal memory and a slick product showcase demand totally different approaches and tools.
This is, without a doubt, the fastest and most futuristic way to bring your images to life. AI video generators are built for one thing: speed. This makes them a dream come true for marketers who need a talking headshot for a campaign yesterday, or creators who want to add jaw-dropping motion without a film school degree.
Forget manually setting keyframes or messing with confusing timelines. Here, you just upload a photo and tell the AI what you want. You could feed it a still portrait and simply type, "Make her smile, look to the right, and say 'Welcome to our store!'" The AI does the heavy lifting.
This approach isn't just a gimmick; it's taking over. Recent data shows a whopping 63% of video marketers now use AI in their workflow, a huge jump from just 51% the year before. And with AI handling the technical stuff, 59% of businesses are now creating all their video content in-house. It’s a game-changer. For a closer look at the latest options, check out SocialJack Media's Top 5 AI Image and Video Tools of 2025.
Next up, we have the apps living right on your phone—think CapCut, InShot, or Videoleap. If you're creating something for TikTok, Instagram Reels, or YouTube Shorts, these apps are your absolute best friends. They're designed from the ground up for vertical video and are stuffed with the trending effects, wild transitions, and viral audio clips you hear all over social media.
The workflow is just so intuitive. You can trim clips, slap on some text, and drop in a song with a few quick taps. Sure, you don't get the granular control of desktop software, but that's not the point. These apps excel at getting a fantastic-looking video made and posted in minutes, not hours.
For the perfectionists out there who crave ultimate creative control, nothing beats traditional desktop software like DaVinci Resolve, Adobe Premiere Pro, or Final Cut Pro. This is the path for anyone who wants to fine-tune every last detail, from the precise speed of a Ken Burns pan to complex color grading and professional audio mixing.
The learning curve? Yeah, it's steep. But what you invest in learning, you get back tenfold in creative freedom. This is how you craft a truly cinematic experience from a collection of still photos.
This is the right choice for bigger, more ambitious projects:
Detailed documentary-style videos that weave photos together with interviews and B-roll. Professional client work where brand guidelines and pristine quality are non-negotiable. Personal projects where you have a specific, polished artistic vision you refuse to compromise on.
Feeling a bit overwhelmed by the options? Don't be. Each method has its time and place. This table breaks down the key differences to help you find the perfect fit for your project, your skills, and your budget.
| Method | Best For | Skill Level | Creation Speed | Typical Cost |
|---|---|---|---|---|
| AI Generators | Quick social media content, talking headshots, animated avatars, marketing ads | Beginner | Blazing Fast (Minutes) | Free tiers, then ~$10-50/mo |
| Mobile Apps | TikToks, Instagram Reels, YouTube Shorts, casual vlogs, trendy edits | Beginner-Intermediate | Fast (Minutes to an hour) | Free with watermarks, Pro ~$5-15/mo |
| Desktop Editors | Professional client work, documentaries, cinematic projects, art pieces | Intermediate-Advanced | Slow (Hours to days) | Free (Resolve) to $20-50/mo or one-time fee |
Ultimately, the "best" tool is the one that gets your video made without causing a massive headache. If you're leaning toward the AI route and want to see just how powerful these new tools can be, dive into our detailed guide on the best AI video generators.
Alright, you’ve got your photos lined up and your software is humming. It's time to roll up your sleeves and get into the fun stuff. This is where you graduate from being a photo collector to a video storyteller, molding your raw images into a narrative that flows. Forget the software for a second—the real magic happens in the creative choices you make right now.
The biggest trap people fall into? Treating this like a boring, old-school slideshow. Just dropping photos onto a timeline one after another is a one-way ticket to getting your audience to scroll on by. We’re here to add movement, rhythm, and a little bit of soul.
One of the oldest tricks in the book is still one of the absolute best: the Ken Burns effect. It’s that classic technique where you slowly pan and zoom across a static photo, tricking the eye into seeing movement and creating a far more cinematic feel.
Think about a big group photo from a family reunion. Instead of just letting it sit there, you could start with a slow zoom into your grandma’s smiling face, then gently pan across the line of cousins. That simple motion turns a flat picture into a dynamic mini-scene, guiding your viewer’s attention exactly where you want it. Seriously, nearly every editing tool out there has this feature built right in.
If you're hunting for the right program to pull this off, check out some expert roundups on the best video editing software.
Transitions are the glue holding your story together, but they can also be the tacky glitter that ruins everything. A cheesy star wipe or a clunky page peel can yank your viewer right out of the moment. The secret is to match the transition to the mood.
Cross Dissolve: This is your trusty, elegant workhorse. A soft fade from one image to the next is perfect for anything emotional or nostalgic. It’s smooth, subtle, and never screams for attention. Hard Cut: Sometimes, the best transition is no transition at all. A clean, instant jump from one photo to the next injects energy and quickens the pace. It's a must-have for upbeat montages. Wipes and Slides: Use these with caution! A quick, stylish slide can look great in a modern travel vlog or a slick product showcase, but overdo it, and you're back in 90s PowerPoint territory.
Your goal with transitions should be invisibility. The best ones are felt more than they are seen, guiding the viewer from one moment to the next without breaking the narrative spell you're trying to cast.
Last but not least, let's talk timing. Not every photo deserves an equal slice of the timeline. How long each image stays on screen is a powerful storytelling lever that controls the entire rhythm of your video. Want to dig deeper into the tools for the job? We break it down in our video editing software comparison.
Varying your timing is crucial for keeping people hooked. A rapid-fire sequence of photos, each on screen for just a second or two, can build incredible excitement or show a passage of time. Then, you can hit pause. Let a truly powerful, emotional photo linger for five or even six seconds, giving your audience a moment to really feel its weight. This intentional pacing is what separates a thoughtful video from a soulless, automated slideshow.
Let's be honest, audio is the soul of your video. Without it, you’ve basically made a fancy, modern-day silent film. But add the right music and maybe a bit of voice, and suddenly you’re creating an emotional experience that actually sticks with people. This is where the magic happens.
Think of your background music as the emotional tour guide for your viewers. A soft, acoustic guitar track can instantly make a collection of old family photos feel warm and fuzzy. On the flip side, a driving electronic beat can turn a travel montage into a full-blown adventure.
The whole game is about matching the music to the story you're trying to tell. And whatever you do, don't let a copyright strike torpedo your hard work. Stick to royalty-free music.
Thankfully, finding great music isn't the Herculean task it used to be. You don't need a Hollywood budget, just the right places to look. These platforms are packed with massive libraries of tracks you can use without getting into legal trouble.
YouTube Audio Library: This is a fantastic, and 100% free, resource built right into YouTube Studio. It’s loaded with both music and sound effects.Artlist & Epidemic Sound: These are the darlings of the creator world for a reason. They're subscription services with incredibly high-quality, curated catalogs and dead-simple licensing. Perfect if you're doing any commercial work.Pixabay Music & Pexels Music: You know them for stock photos, but they also have a surprisingly solid collection of free-to-use music.
Feeling adventurous? You could even play around with an AI music generator to cook up a completely unique track that fits your video’s mood and length perfectly. To see how this works, you can learn more about AI music generation in our detailed guide.
Sometimes, your video needs more than a great song—it needs a human voice. A simple voiceover can provide crucial context, share a personal anecdote, or deliver a crystal-clear call-to-action. You don’t need a fancy studio; the microphone on your smartphone and a quiet closet will get you 90% of the way there.
A great voiceover feels like a conversation, not a speech. Jot down a simple script, but don't be afraid to ad-lib. Speak clearly, let your personality come through, and connect with your viewer.
When you turn photos into videos, getting the audio mix right is the final, crucial step. Your background music should be just that—in the background. Drop the volume so it supports your voiceover instead of fighting it. A few subtle sound effects, like a camera shutter click or a soft whoosh on a transition, can add that final layer of polish that makes the whole thing feel alive.
Alright, you’ve done the creative heavy lifting. You’ve wrangled your photos, tweaked your transitions, and laid down the perfect soundtrack. Now for the final hurdle: getting that video out of your editor and into the world, looking just as good as you intended.
Hitting "export" without a plan is like getting a masterpiece professionally framed in cardboard. It just doesn't do it justice. This last step is all about making sure your hard work translates perfectly to whatever screen your audience is using, whether that’s a giant TV or a phone on the bus.
Jumping into the export settings can feel like trying to land a 747. So many buttons, so many acronyms. Don't sweat it. You really only need to nail a few key things to get a fantastic result when you turn photos into videos.
Let's break it down:
Resolution: This is just a fancy word for video size and clarity. For most things you'll post online, 1080p (1920x1080 pixels) is your magic number. It looks sharp on just about everything without creating a file so massive it takes a week to upload. Sure, you could go for 4K, but save that for your cinematic masterpiece, not your social media clips. Frame Rate (fps): How many pictures flash on the screen per second? 24 fps gives you that classic movie vibe. 30 fps is the web standard and looks a touch smoother. For social media, stick with 30 fps—it’s what the platforms are built for. File Format: This one’s a no-brainer. Choose MP4 (using the H.264 codec). Seriously, just do it. It’s the universal language of video—every device, platform, and browser speaks it fluently. It gives you an amazing balance of quality and file size.
Think of it like this: Compression is packing a suitcase. You need to get everything to fit without turning your favorite shirt into a wrinkled mess. The goal is a file that’s small enough to upload quickly but still looks crisp and clean when unpacked on the other side.
Here’s a hard truth: one size does not fit all. Just throwing the same video file at every social media platform is a rookie move, and it'll tank your engagement. Each network has its own vibe, and a huge part of that is the screen shape.
Short-form video is king right now, and it’s expected to make up a staggering 82% of all internet traffic. Photos-to-video content, especially the quick, sub-one-minute clips that AI tools excel at creating, can see engagement rates as high as 50%.
With vertical HD (1080x1920) uploads jumping 51% year-over-year, the writing is on the wall: you need to think vertically. You can check out more 2026 predictions for short-form video to see just how big this trend is.
So, here’s your cheat sheet for formatting. Don’t ignore this.
| Platform | Best Shape | Ideal Size |
|---|---|---|
| Instagram Reels/Stories | 9:16 (Vertical) | 1080 x 1920 |
| YouTube Shorts | 9:16 (Vertical) | 1080 x 1920 |
| TikTok | 9:16 (Vertical) | 1080 x 1920 |
| Standard YouTube/Facebook | 16:9 (Widescreen) | 1920 x 1080 |
It might feel like an extra chore, but taking a few minutes to export a proper vertical version for Reels, Shorts, and TikTok will make a world of difference. You’ve come this far—don’t let ugly black bars kill your video’s vibe.
Alright, you've got the lay of the land and a peek at the tools, but let's be real—a few questions are probably still bouncing around in your head. Let's get into the nitty-gritty and tackle the stuff everyone asks when they first start turning photos into videos.
This is the big one, right? The secret isn't just in the software; it starts with your source material. Always, and I mean always, use the highest-resolution photos you can get your hands on. A pixelated, fuzzy photo is only going to look worse when it's moving.
Once you’re in your editor, make sure your project settings match your goal. Aiming for a crisp look on YouTube? Set your project to 1080p (1920x1080) from the get-go. When it's time to export, don't skimp. Pick a high bitrate and stick with the H.264 (MP4) format. There's a reason it's the gold standard—it balances fantastic quality with manageable file sizes.
A video is only as good as its weakest link. Start with sharp photos and use the right export settings, and you'll get a professional-looking result every single time.
Honestly, there's no single right answer. It's less about a magic number and more about the vibe you're trying to create. The real question is: what's the pace of your story?
Fast and Punchy: Think of a high-energy travel montage or a rapid-fire product showcase. Here, you might show each photo for just 2-3 seconds. Do the math, and you're looking at around 20 to 30 photos to fill that minute. Slow and Sentimental: For a heartfelt tribute or a slow-burning story, you need to give each image room to breathe. Holding a powerful shot for 5-7 seconds lets the emotion sink in. With that pacing, you might only need 10 to 15 photos.
Good news: you don’t have to break the bank to get incredible results. If you’re editing on your phone, CapCut is pretty much the king of the hill right now. It's loaded with trendy effects, has a giant music library, and is surprisingly easy to figure out.
Working on a desktop and craving more control? The free version of DaVinci Resolve is an absolute powerhouse. It gives you professional-level editing tools that many people pay big bucks for. Just be ready for a bit of a learning curve—it's the real deal.
Ready to skip the learning curve entirely and let AI handle the heavy lifting? With SendFame, you can turn your static images into dynamic, scroll-stopping videos in just a few clicks. Bring your photos to life by visiting https://sendfame.com today.
Create Epic
SendFame
Create Epic with SendFame!
Questions: info@sendfame.com
