Explainer Video Maker Guide to Creating Videos Fast

explainer video maker
Welcome offer — 56% OFF


Master your screen recorder mac with this 2026 guide. Learn built-in tools, audio setup, pro tips, and create AI-ready content on your Mac.
You're trying to record a quick Mac demo, a bug, or a training clip, and the result looks fine in the moment, then falls apart when you play it back. The cursor feels too fast, the audio sounds thin, the file is bigger than you expected, and suddenly the easiest part of the project becomes the part you avoid sharing.
A screen recorder Mac workflow only works when you treat it like production, not a panic button. The built-in tools are good enough for a lot of jobs, but the difference between a rough capture and a usable asset usually comes down to setup, permissions, audio choice, and frame rate discipline. If you also want to reuse that footage inside modern AI video workflows, the bar gets even higher, because clean source material saves you from fighting artifacts later. For a practical companion to polished demos, professional-looking video habits matter more than commonly acknowledged.
Why Your Mac Screen Recordings Fall ShortMastering Your Mac's Built-In Screen Recorder Using the Screenshot toolbar Using QuickTime PlayerPro-Level Configuration for Crystal-Clear Recordings Frame rate is a choice, not a default to ignore Audio should match the actual audience Reduce strain before you hit recordHow ScreenSnap Pro Can HelpFrom Raw Recording to AI-Ready ContentTroubleshooting Common Screen Recording IssuesNext Steps In Your Recording Workflow
The most common failure isn't that the recording button doesn't work. It's that the clip works technically but still feels hard to watch, hard to edit, or hard to reuse. A creator records a software walkthrough, then notices tiny mouse misfires, uneven sound, and footage that feels too cramped once it's uploaded to a team doc or content platform.
That happens because screen recording on a Mac isn't one decision, it's a chain of small choices. If you leave everything at defaults, you often get the display, the microphone, and the file format the system thinks you want, not the one your project requires. A better workflow starts with the tools Apple already gives you, then adds discipline around frame rate, permissions, and post-capture cleanup.
Practical rule: If the clip is meant for teaching, selling, or repurposing, the recording should already look edited before you open an editor.
That mindset matters even more if the recording is just one input in a bigger creative workflow. A clean demo can become a support asset, a product walkthrough, or source footage for AI video generation. A messy one usually stays trapped on your desktop.
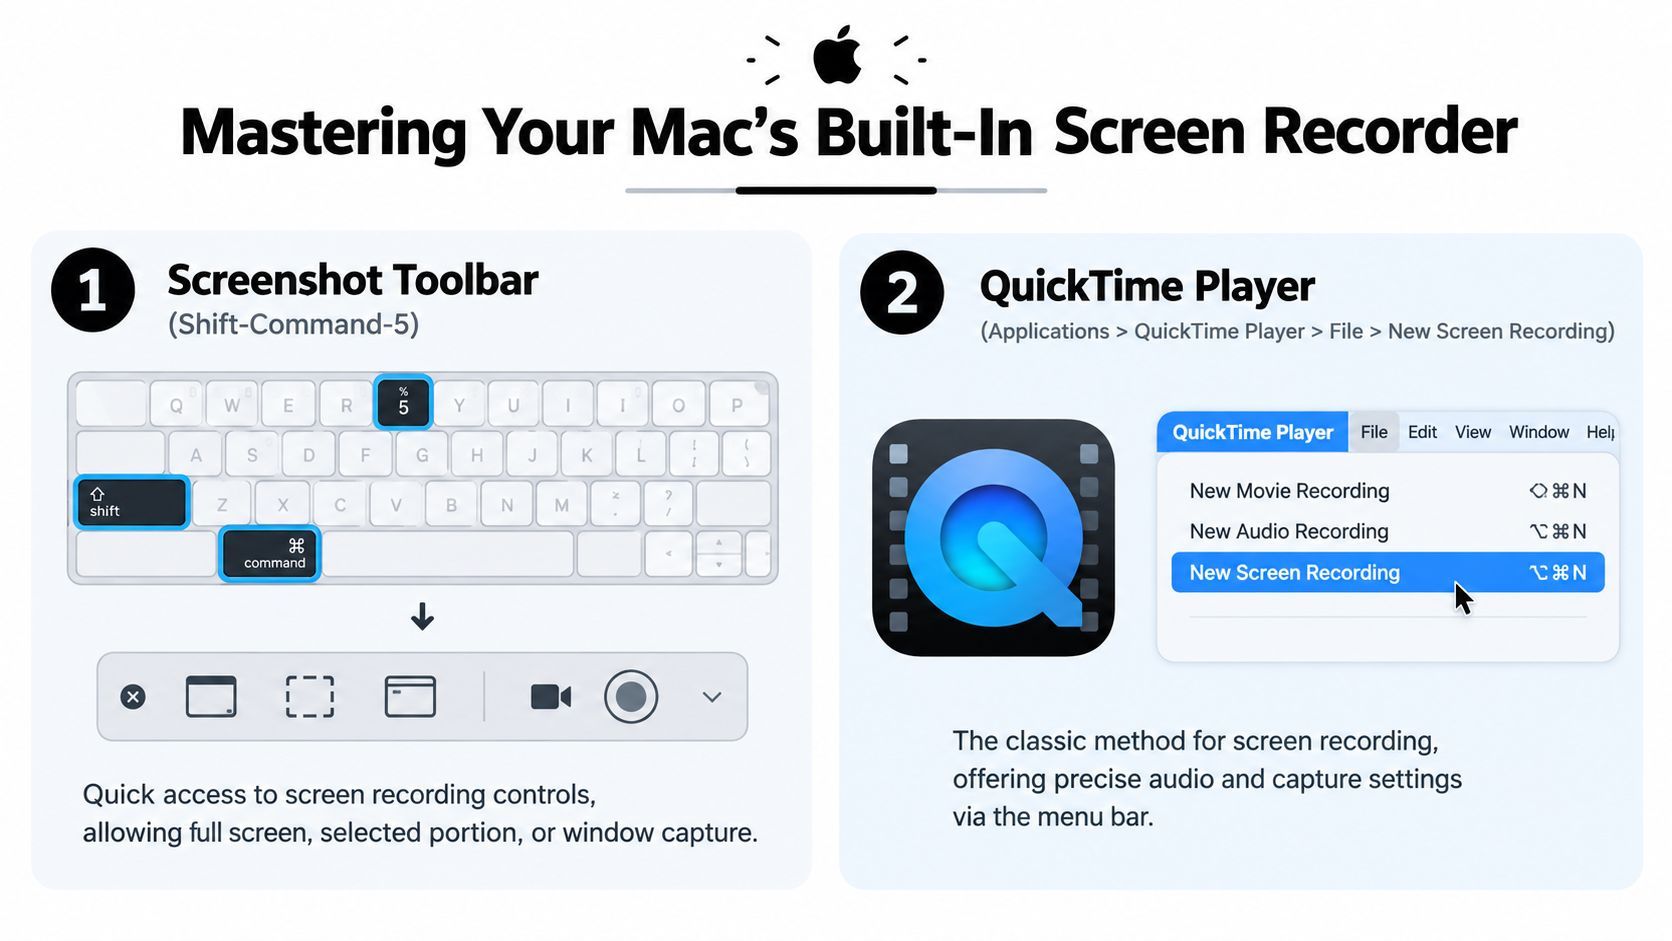
Apple gives you two native ways to record the screen, and both are worth knowing. The modern path is the Screenshot toolbar, opened with Shift-Command-5. The classic path is QuickTime Player, which many people still prefer because it feels familiar and keeps the recording flow simple.
The low-level Apple implementation behind native capture uses AVFoundation, with AVCaptureSession coordinating the pipeline, AVCaptureScreenInput feeding the display, and AVCaptureMovieFileOutput writing a QuickTime movie file. Apple's documentation says screen recording on OS X 10.7 Lion and later should use AV Foundation, which makes this the canonical low-level approach for macOS capture, and the practical sequence is straightforward, initialize the session, attach the screen input, attach the movie output, then start and stop the session as needed. Apple's AVCaptureScreenInput documentation is the reference point if you ever need to understand the plumbing behind the UI.
Press Shift-Command-5 and the control strip appears at the bottom of your screen. From there, choose Record Entire Screen if you're capturing an app demo or a process that moves across windows, or choose Record Selected Portion when you only want a clean crop around one area. The selected portion option is useful when your desktop is cluttered or when you want to hide unrelated notifications and icons from the frame.
Open Options before recording. That menu is where you choose the save location, set a short timer, and pick the microphone if you're narrating. If you're recording a tutorial, a countdown gives you time to get the cursor positioned and the app ready before the capture starts.
Once you hit Record, macOS adds a small stop control in the menu bar. That tiny button matters more than people expect, because it gives you a clean end point without needing to hunt for keyboard shortcuts while you're talking. When you're done, the file saves automatically.
QuickTime Player is the quieter, more deliberate option. Open QuickTime Player, then go to File > New Screen Recording. The same screen-capture controls appear, but the interface feels slightly more media-oriented, which can be useful if you already live in QuickTime for trimming and review.
One advantage is that QuickTime makes the handoff from recording to playback feel immediate. That's helpful when you want to check whether your narration, cursor movement, or window framing looked right before you move on. It's also a practical choice when you want to trim the beginning or end of a take without leaving the app.
The simplest recording setup is usually the right one for short product demos, internal walkthroughs, and support clips.
A common mistake is thinking quality comes from recording longer or with more visual detail. In practice, quality usually comes from choosing the right audio source, the right frame rate, and the right amount of visual complexity for the job. If you don't choose those intentionally, the Mac still records, but the result can be harder to ship and harder to reuse.
For most Mac screen recordings, 30 fps is the practical sweet spot. Independent benchmarking and expert guidance say 60 fps is only worth the extra file size and encode load when the content has fast motion, scrolling, or gameplay, and one expert guide says 60 fps roughly doubles the captured data compared with 30 fps, which increases storage use and export time. ScreenKite's Mac screen recording guidance makes the trade-off clear.
That's why many tutorial videos don't benefit from 60 fps at all. A software walkthrough, a slide-based lesson, or a product demo usually gains very little from doubling the capture load. A fast gameplay clip or a scrolling-heavy UI demo is different, because the motion itself is part of the message.
The other issue is display refresh mismatch. Community reports indicate macOS recording often lands near 59.86 fps rather than a true 60.00 fps encode, and attempts to exceed 60 fps can still appear capped in the final footage even on high-refresh ProMotion hardware. That means chasing a number on paper can be less useful than focusing on whether the clip looks stable and readable in playback.
Mac users often mix up microphone audio with system audio. A microphone captures your voice, but it won't automatically capture app sounds, alerts, or playback from the computer unless your setup routes audio that way. If you're creating spoken tutorials, narration usually matters more than machine audio, so a clean mic signal can be the better priority.
For a support video, product demo, or AI-assisted edit later, clean audio pays off twice. It helps the viewer understand the clip now, and it gives editing software less noise to fight later. If you're recording a talking walkthrough, keep volume consistent and avoid clipping, because distorted audio is harder to rescue than a slightly plain visual track.
Close unused apps before you start. Hide desktop clutter if the recording shows the whole screen. Keep the resolution aligned with the final destination instead of assuming the highest available setting is always best.
A desktop that looks harmless to you can feel noisy on video. Notifications, browser tabs, and extra windows all compete with the thing you're trying to teach. If the recording is going to be used as raw material for editing or AI creation, simplicity helps even more because it gives later tools a cleaner source.
Rule of thumb: record the smallest useful version of the action, not the most dramatic version of your desktop.
Best AI video editing software options are easier to work with when your source footage is already legible and steady.
Some projects outgrow the built-in tools because the recording is only half the job. You might need annotation, cropping, background styling, quick sharing, or a way to keep screenshots and short clips moving through the same workflow without opening three separate apps. That's where a tool like ScreenSnap Pro for Mac becomes relevant, especially if your work mixes screen capture, fast edits, and lightweight handoff.
ScreenSnap Pro combines screen recording, annotation, OCR, website capture, and sharing in one app, with support for webcam, system audio, microphone, and exports to video or GIF. It also includes timeline-based zoom-ins, a Quick Access Overlay, pinned captures, and a set of presentation controls like backgrounds, rounded corners, and drop shadows. For teams that document software or produce recurring walkthroughs, that means less hopping between a recorder, an image editor, and a file-sharing step.
The value isn't that it does everything. The value is that it removes the little gaps that slow people down. If you constantly need to highlight an on-screen change, blur a sensitive section, or send a polished clip without opening a separate editor, a consolidated tool can make the workflow feel much lighter than the native path alone.
It also stays local by default and works offline when cloud features aren't used, which matters if you want tighter control over files before sharing them. For readers comparing options, the pertinent question is whether you need simple capture or capture plus cleanup. If you're in the second camp, a dedicated utility like this can shorten the distance between “recorded” and “ready.”
Treat a recording as source footage, not the final deliverable, and the edits get simpler. I usually start with a quick trim in macOS to cut awkward starts, dead air, or the pause after I stop speaking. That small cleanup makes the clip feel more deliberate without turning the workflow into a full edit session.
Permissions can stop the whole process before a file is even created. If screen capture or audio fails, check System Settings under Screen & System Audio Recording, grant access, then relaunch the app so macOS applies the change cleanly. Apple's support page on screen and system audio recording permissions is the reference for the current access flow.
After trimming, the recording can serve a second job. A clean product demo can feed an AI-assisted video workflow, and a talking clip can be reused for localized versions, avatar-style delivery, or lip-synced variations. For a practical example of that workflow, see SendFame's AI video creation guide, which shows how screen footage can move into generated assets without rebuilding the idea from scratch.
Quality matters because AI tools work better with clear input. Keep the framing steady, the motion controlled, and the text readable. Clips with visual clutter, jumpy cursor movement, or uneven pacing are harder to repurpose and usually need more cleanup before they can work in a content pipeline.
The first thing I check is permission. If a Mac recording fails, macOS usually isn't being stubborn, it's waiting for access to screen and system audio recording. Open System Settings, find Screen & System Audio Recording, grant the app access, then quit and relaunch it so the change takes effect.
If the recorder does not show up in that list, open it once and come back to the settings. macOS only lists apps that have asked for permission, so the app has to request access before you can approve it. After you change the setting, test again in a fresh session.
One quick pattern saves time.
Black screen during playback: the source may block capture, or the app may protect that window. Try a different app or a plain desktop window first. No narration in the file: check the microphone source before you hit record. Screen video can record cleanly while voice input is still missing. File size feels too large: shorten the take and avoid higher quality settings unless the footage really needs them. It worked once, then stopped: recheck permissions after system updates, then relaunch the recorder and run a short test.
A short test recording catches most failures before they waste a full take. Ten seconds is usually enough to confirm that permissions, audio, and video are all working together.
The other fix is process, not settings. If you want to turn screen footage into AI-ready material, keep the capture steady, readable, and free of clutter. That makes later reuse much easier, especially for workflows like how to make AI videos from screen footage.
Once you've got the native workflow under control, the next decision is whether you need more than capture. If your job is quick internal demos, Apple's tools may be enough. If you need heavier editing, live annotation, streaming, or studio-style layouts, third-party recorders start making more sense.
Use the tool category to match the task. Advanced editing and effects tools suit long-form tutorials. Live annotation and presentation tools suit product walkthroughs and support work. Streaming-oriented tools suit creators who are recording for live distribution as much as for playback.
The important habit is to record with the end use in mind. A one-off screen grab can be plain. A clip meant for clients, onboarding, or AI-assisted reuse needs sharper framing, cleaner audio, and fewer surprises. That shift in mindset saves time because you spend less effort rescuing footage later.
Start with the built-in recorder on your Mac, fix permissions when they break, and treat every capture like material that might be reused, not just watched once. Then turn one clean recording into documentation, a tutorial, or a source asset for your next AI video project. If you've been waiting for the “right setup,” make today's clip the one that finally leaves your desktop and gets used.
Create Epic

SendFame

Create Epic with SendFame!
Questions: info@sendfame.com